Pages

Monday, December 13, 2010

My Christmas Kitchen


 Yep I still need to add pictures to the snowflake frames. I plan on using one of our Christmas cards that has a few smaller pictures.

 It's kinda a snow theme...
 Handmade crochet snowflakes made by my grandmother years ago. Love them!

 Can't forget the kids...
 Yep Tacky window stickers, but if it keeps the kids entertained while I'm throwing dinner together then so be it. But the fresh blanket of snow is pretty.
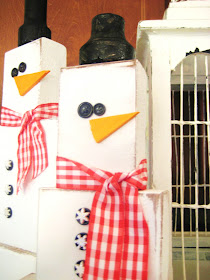
 My little Snowmen family on top of my fridge. See tutorial here. So cute and easy!

A little more unique Christmas front porch with an antique sled and iceskates.
$5 goodwill sled, functional and pretty. I had to fight my mom for her old skates, but worth it ;)

The DIY Show Off
The Girl Creative
Hooked-on-Holiday-House-Tours


Thursday, December 9, 2010

O Tannenbaum

 Here is our beautiful Christmas tree this year. The theme is silver and red. Last year it was just silver but I felt like it needed red to tie into the red of our Christmas decor better.
Anyone else have a leaning angel? Hubby doesn't care and I'm too prego to try to fix it. ;)
 I love that during the day the poinsettas and the silver really stand out from darker green of the tree.
 And the stockings were hung by the chimney with care.


I love our garland along the stairwell. (And here's a sneak peek of the Christmas kitchen decor.)


And here's the best for last. Now who doesn't love a glowing tree at night? Feels like Christmas Eve.

Hooked-on-Holiday-House-Tours

Monday, December 6, 2010

Deck the Halls- Dining Room

Ohh how I love decorating for Christmas. Here's what I did this Christmas in our dining room. Ohh how I love it.
It is just so easy with Red and Greenery and Sparkle all over!
 MMM take in the Bling Bling.

 I got my red ornaments last year at Target's after clearance sale for 90% off!!
That's like basically free. I stocked up but now I wish I would have gotten more. :)


 My Joy and Believe were after Christmas buys at TJ Maxx. 
This Believe banner could so easily be recreated by all you crafters out there.
Now who wants to join me for Christmas dinner?
Stay tuned for my Family Room, Kitchen, and Porch Christmas decor.
Coming Soon!

Thursday, December 2, 2010

2x4 Snowman Family

 How cute is this wood block snowmen family? I made them yesterday on a whim, and the best part is that  I already had everything on hand. I got my idea from Crafty chic mommy, then gave it my own special touch.

How great would these be for gifts?
 Supplies needed:
  • 2x4s or 2x6s
  • paint stick or thin wood
  • sandpaper
  • white and orange paint, brown ink or paint
  • buttons
  • glue- I used my handy dandy hot glue gun
  • ribbon for scarf
  •  wood or something for hat
 To make these is pretty self explanatory. Cut wood, sand, paint white. I then inked the edges brown for a  more rustic look. Glue body together.

Then glue on your cutie accessories. The nose is a cut up paint stick.
 For the hats I used baseball bat end discards that I got from the Louisville Slugger Museum for FREE. But not everyone lives in good ol' Louisville. So you could use the end part of your paint-stick (where it is curved), smaller pieces of wood, or fabric to make your hat or go with out. 
Get creative and have fun!
linking up to Funky Junk's SNS


cg holiday button

Friday, November 19, 2010

Easy Washer and Dryer Stand Tutorial

Alrightly folks here is a tutorial on how to build your own washer and dryer stand for way less than those store bought ones. Plus I think this is even better because of the storage underneath and on the side.

Here is what you are building:

 Supplies needed-
Wood- Have store cut plywood for you :)
  • 1 top- plywood- 30 x 60 inches
  • 2 sides- plywood- 18 x 30 inches
  • 1 back- plywood- 18 x 60 inches
  • 10  2x4's cut to 18 inches
  • about 140 inches of trim (we did not trim the side against the wall, adjust yours accordingly)
 Other Supplies:
  • box of screws- 2 1/2 inches
  • primer
  • paint -brushes
  • 2 L brackets
  • wood glue (optional)
  • small nails with no head for trim
  • spackle
  • miter saw to cut 2x4's and trim
  • drill with lots of battery power :)

  1. Ok Have all your 2x 4's and plywood cut to size? Then time to screw your 2x4's into your plywood back. 3 pieces evenly spaced flat along the back- leaving about 3/4 inch, or thickness of plywood, on both ends. (look closely at picture) We did 2 screws on bottom, 2 on top and you can use wood glue if you want.- *Unlike the picture go ahead and screw another 2x4 into the center back 2x4 making it double wide*. :)
  2. Make 2 Sides- only put 2  2x4's flat along the sides leaving one end with out a 2 x4. 
  3. Connect sides to back. The "open" side of side piece then goes at a 90* angle to back piece in the 3/4 inch space you left. See picture.
4. Screw top into place- into the 2x4's. Ohh it's beginning to come together.
 Should look like this... except your center back piece should be double wide. :)

 5.  Using the last 2 pieces, screw and glue them together, then screw them into top, then using your 2 L brackets secure them on the back side to the top.

 
 6. Time to start the trim. Measure twice cut once. Use your nails to hold in place, optional wood glue.

 7. Should look like this. Time to plaster/ putty those gaps with your spackle. Can spackle any plywood pieces that might be a little course as well. But honestly most of it will be covered by the washer and dryer. Let dry.
8. Sand and smooth
9. Prime and prime again, and Paint!


Wah lah you have yourself a beautiful fully functional washer and dryer stand!!!
  

Here's my before: Love all that crap on the top, and the big basket of shoes peeking in the corner?
And After: Ahh Bliss. Clean, organized and funcional. Yay!

 Whatcha think?
If you found this post helpful I would love you to be a follower! Thanks!!